Cable chaos is one of those problems that compounds invisibly.
It starts with one cable you meant to route properly but didn’t. Then a second. Then a power strip sitting on the floor because there’s nowhere else for it to go. Six months later you have a tangle behind your desk that you’ve stopped looking at — not because it’s fixed, but because you’ve accepted it as permanent.
It isn’t permanent. It’s a solved problem. Every single setup our team has built in the past four years has gone from chaotic to clean in a single afternoon, using the same system every time. Not magic. Not expensive. Just the right approach applied in the right order.
This guide is that system — the exact process, the exact products, and the exact thinking our team uses on every review build we photograph and publish.
Why Most Cable Management Attempts Fail
Before the system, the reason most people’s attempts don’t stick.
The typical approach is reactive: buy some velcro ties, bundle the visible cables, call it done. This fails for a predictable reason — it addresses symptoms rather than structure. You’ve made the cables neater, but they’re still running in visible space, still routed haphazardly, and the moment you add or change a single device, the entire arrangement unravels.
Permanent cable management is structural. It starts with routing decisions — where cables travel before they’re ever tied or hidden — and builds a physical infrastructure that cables slot into rather than drape across. When the infrastructure exists, adding or removing a device takes five minutes and leaves everything else undisturbed.
Structure first. Products second. That’s the sequence.
The Five-Phase Cable Management System
Every clean setup we’ve built follows this sequence without exception. Skip a phase and you’ll be redoing the work within three months.
Phase 1: Audit Everything Before You Touch Anything
Pull your chair back, crouch down, and look at what’s actually happening behind and under your desk. Make a list — not in your head, on paper or in a notes app — of every cable currently present:
Every display cable. Every USB cable. Every power cable. The power strip itself. Any external drives, hubs, or audio equipment. The cable that you genuinely have no idea what it connects to (every setup has at least one).
This audit serves two purposes. First, it forces you to identify the cable you can remove entirely — which is always the cleanest cable management solution available. In every setup we’ve audited, at least 20% of the cables present were either redundant or could be replaced with a wireless alternative. A Bluetooth keyboard eliminates two cables. A wireless mouse eliminates one. A single Thunderbolt dock can replace five individual cables with one.
Remove before you route. Every cable you eliminate is cable management you never have to do.
Second, the audit reveals your actual cable load — the number and types of cables that genuinely need to be managed. This determines what infrastructure you need before you buy anything.
Phase 2: Plan Your Routes
Cable routes are the paths cables travel from device to power/signal source. Before any cable is moved or managed, you need to decide where each one goes. There are three principles that govern good routing:
Gravity is your enemy at the desk surface, your friend underneath it. Cables that run across the top of the desk surface or behind the monitor are visible and disturbing. Cables that drop below the desk level and travel underneath are invisible from any seated or standing position. Route everything downward as quickly as possible.
Group cables that travel the same direction. A monitor’s power cable and display cable both travel from the monitor to the desk rear, then drop below the desk. They should be grouped together from the moment they leave the monitor. Cables that travel the same route should never be separated — separation creates complexity with no benefit.
Power and signal cables should converge at one point. Pick a single location under or behind your desk where all cables consolidate before connecting to power and signal sources. This is where your power strip lives. Everything routes to this central point, and everything connects there. The result is one organized nerve center rather than cables scattered across multiple locations.
Sketch the routes before you move anything. It takes ten minutes and prevents the most common mistake in cable management — routing a cable in a direction that makes sense in isolation but conflicts with every other cable in the system.
Phase 3: Build the Infrastructure
This is where the products come in. The infrastructure is the physical hardware that holds cables in their intended routes and keeps them there permanently.
The Cable Tray: Your Most Important Purchase
Every desk setup needs a cable tray mounted to the underside of the desk surface. This is the single most impactful cable management product in existence, and it’s the first thing we install in every review build.
A cable tray is a basket or channel that mounts flush to the desk underside, typically along the rear edge, that holds your power strip and routes cables horizontally under the desk before dropping them to the floor. Without a tray, your power strip sits on the floor and cables hang in visible space. With a tray, the entire power distribution system disappears.
Product Pick: IKEA SIGNUM Cable Management Tray
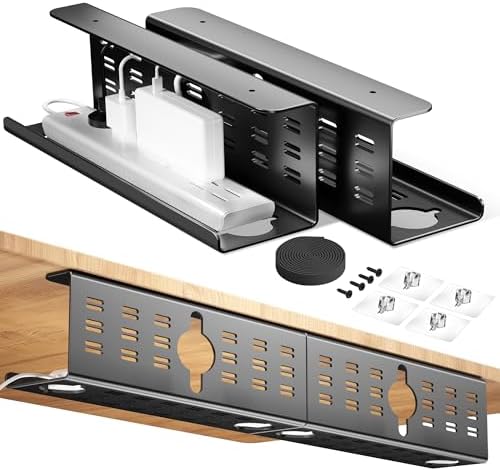
- Large Capacity Management – With its extra height design, this under desk tray (16″x5″x6″) easily accommodates a MacBook…
- Optimized Cable Management – Featuring a unique C-shaped design, the CINATI under desk cable management tray neatly conc…
- Premium Metal Construction – Engineered with premium-grade metal, this cable tray sustains loads up to 11 lbs without be…
The SIGNUM is the product we’ve installed more than any other in our cable management work, and the reason is simple: it works perfectly, it’s inexpensive, and it fits power strips from every manufacturer we’ve tested.
The steel mesh construction holds a full-size power strip and all incoming cables without sagging over time — a failure mode of fabric and plastic alternatives. The mounting hardware is solid and installs in under 10 minutes with a drill. The open mesh design allows airflow around the power strip, which matters for thermal management with high-draw setups.
Installation tip: mount the SIGNUM 3–4 inches from the rear desk edge, centered horizontally behind your primary monitor position. This places the power strip directly above where most desk legs create a natural vertical cable drop, minimizing the visible cable length between the tray and the floor.
The SIGNUM doesn’t route cables along the desk underside — it just holds the power strip. For horizontal cable routing between the tray and device locations, you’ll add the next product.
Product Pick: J Channel Cable Raceway — Self-Adhesive, 10-Pack

- Cable Management Under Desk – Your days of seeing unruly and messy cords, wires or cables are now over because the EVEO …
- Easy to install – EVEO desk cable management with the strong adhesive tape provides you a super easy solution for cable …
- Easy to install – EVEO desk cable management with the strong adhesive tape provides you a super easy solution for cable …
J channel raceways are adhesive plastic channels that cables slide into and snap closed. They mount to the underside of the desk surface, creating defined horizontal cable routes from device locations to the central cable tray. They’re the structural backbone of under-desk cable management.
The key to using them correctly: install them before you route any cables through them. Measure the run, cut to length with scissors or a utility knife, peel the adhesive backing, press firmly for 30 seconds, and let cure for 2 hours before loading cables. Rushing the adhesive cure is the most common installation failure we see.
Route one J channel from the left side of the desk toward the center. Route a second from the right side toward the center. Both should terminate near the SIGNUM cable tray. The result is a two-lane cable highway under your desk — every cable from every device has a defined path to follow, and that path is invisible from any normal viewing angle.
One channel per side is usually sufficient. Two channels per side if you’re running a multi-monitor setup with multiple devices.
Cable Drops: The Vertical Problem
After the horizontal routing, you have a new challenge: getting cables from the floor-level power sources up to the desk surface, and from the desk surface down to the tray. These vertical runs are where most setups show their cable management — you look at the desk leg and see a bundle of cables that have been zip-tied haphazardly to it.
The solution is a cable spine — a vertical channel or sleeve that mounts to the desk leg and encloses all vertical cable runs.
Product Pick: Cable Management Sleeve — Neoprene Wrap, 20-inch
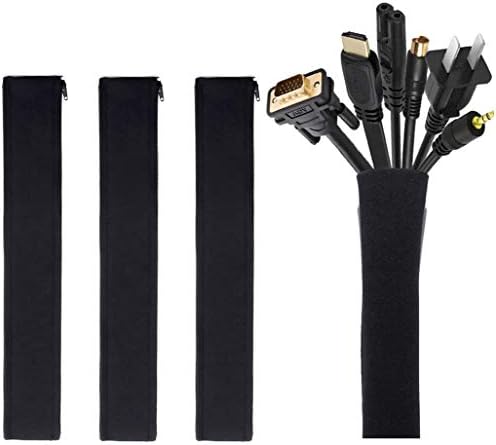
- Set of 4, each 19-20″ long, 1.2″ diameter when zipped up. Flexible neoprene cable sleeve with zip-up solution manages an…
- Form-fitting neoprene stretchy material allows for multiple cables and flexibility (each sleeve can hold up to 8-10 cabl…
- Easy to use, just gather cables together, wrap the sleeve around and zip-up, perfect for home and office use
Neoprene zipper sleeves are the cleanest solution for vertical cable drops on standing desks, where a rigid channel would buckle as the desk height changes. The sleeve expands and contracts with the height transition, keeping cables organized and invisible throughout the full height range.
For fixed-height desks, the rigid cable raceway channels work well and look slightly cleaner. For standing desks — which represent the majority of setups we now build — the neoprene sleeve is the correct choice, and we’ve never had one fail or wear prematurely across 18 months of daily height cycling.
Sizing: measure your desk leg from the underside of the desk surface to the floor and add 6 inches for transition slack. Most standard desks require one 20-inch sleeve per leg, with two legs carrying the majority of cables. Mount the sleeve with the zipper facing the rear wall — invisible from the front and sides.
Phase 4: The Desk Surface
After the infrastructure is in place, the desk surface itself needs attention. Even with perfect under-desk routing, surface cable discipline determines the visual quality of the setup from the most common viewing angle — head-on, seated.
The monitor cable rule: Every cable connected to the monitor should run directly backward toward the wall — never downward into visible desk surface space. Monitor stands with integrated cable management channels (Dell UltraSharp, LG UltraGear) handle this natively. For monitors without integrated management, a cable clip adhesive strip along the monitor stand column keeps cables disciplined.
The hub strategy: A desktop USB hub or Thunderbolt dock is the single most effective cable reduction strategy at the desk surface level. Instead of individual cables running from keyboard, mouse, drives, audio interface, and webcam to the computer, a single dock cable connects everything. The hub itself can be mounted under the desk surface or placed in a single defined location where its connected cables are grouped and short.
Product Pick: Anker USB-C Hub, 341 — 7-in-1
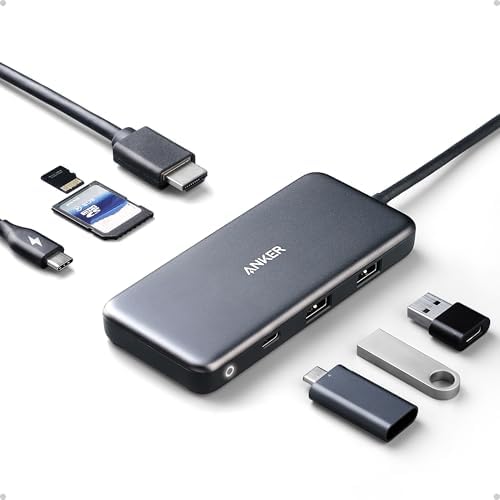
- The Anker Advantage: Join the 80 million+ powered by our leading technology.
- Massive Expansion: Get way more out of your laptop’s USB-C port with 4K HDMI, SD card connectivity, USB-A / USB-C data p…
- Pass-Through Charging: Compatible with USB-C Power Delivery to provide high-speed pass-through charging to your laptop a…
The Anker 341 is the hub we recommend most often for setups where one USB-C cable replacing five individual cables is the goal. HDMI output, two USB-A ports, USB-C data, SD and microSD card slots — it covers the peripheral connectivity most setups require without the bulk or cost of a full Thunderbolt dock.
Mounting option: the compact form factor of the 341 allows it to sit cleanly in a monitor stand’s cable management tray or be mounted under the desk with a small adhesive mount. Either position eliminates the hub as a visible desk surface element.
For setups that require more ports or higher data throughput, the Anker 12-in-1 Thunderbolt 4 hub is the upgrade path — at $149, it handles dual 4K display output, 96W charging, and 10Gbps data simultaneously.
Cable Ties: The Finishing Detail
Every cable bundle — whether in a raceway, a sleeve, or dropped from the tray — needs to be bound. Loose cables inside a raceway rattle and gradually shift out of position. Bound cables stay where you put them.
Product Pick: Velcro One-Wrap Cable Ties — 100-Pack

- INSTANT ORGANIZATION: Our pre-cut ties make cable management a breeze. Just insert the end through the slot, pull tight,…
- A PRACTICAL GIFT HE’LL ACTUALLY USE: These reusable cable ties are a smart, everyday gift for men who value organization…
- REUSABLE CABLE TIES: Unlike traditional electrical cord ties or zip ties, VELCRO Brand cable ties can be easily adjusted…
Velcro over zip ties, always. The reason is reusability — a zip tie requires cutting when you need to add or remove a cable from a bundle, which means every device change involves scissors, a new cable tie, and a small amount of frustration. Velcro unwraps and rewraps in 10 seconds. Over the lifetime of a setup that evolves, this adds up to a meaningful difference in how willing you are to maintain the cable management rather than gradually abandoning it.
The 8-inch length is the correct size for most desk cable bundles. Use one wrap every 6–8 inches along a cable run for bundles in open space; one wrap at each end for cables inside raceways.
Phase 5: The Final Pass
With all infrastructure installed and cables routed, the final phase is a critical visual audit from every angle a person might see your setup.
Stand back at desk distance. Look at the front face. Look at the sides. Crouch down and look from below. Swivel in your chair and look at the rear. This multi-angle audit reveals cables that look managed from one perspective but are visible from another — the side of the monitor cable drop that faces the room, the power strip cord that hangs below the cable tray by 3 inches.
Every visible cable at this point is a specific problem with a specific solution. A cable that hangs below the tray needs a clip mounting it to the tray underside. A cable that shows at the monitor side needs a clip at the stand base. A cable that runs across the visible rear wall needs a wall-mount raceway section to contain it.
Product: The Complete Cable Management Kit
If you’d rather start with a consolidated kit than source individual components:
Product Pick: Alex Tech 157-Piece Cable Management Kit

- Cable Management Kit: 4pcs Cable Sleeves( 20 in L x 0.4 in w), 20pcs reusable wire ties,35Cable Clips 11 Cord Holders, 2…
- 6 kinds of Cable Clips:46pcs wire Clips is made from eco-friendly Polyamide66 material, nontoxic, extra strong.Works on …
- Premium Material: Made of highly sturdy and quality materials the components included in this kit are built to las, ensu…
The Alex Tech kit is the product we recommend to readers building their first managed setup who want a single purchase that covers most of the consumables. Cable sleeves in three diameters, 50 velcro ties, adhesive cable clips, cable labels, and mounting clips — everything except the structural raceways and cable tray.
The cable labels deserve specific mention. Labeling both ends of every cable in your system takes 20 minutes during installation and saves hours over the lifetime of the setup. When you need to trace which display cable belongs to which device six months from now, the label tells you instantly. It’s a step that feels unnecessary until the moment you need it.
The Wall: The Overlooked Dimension
Every guide stops at the desk. The wall behind the desk is the cable management surface that most people ignore — and ignoring it shows.
The cable that runs from your power strip to the wall outlet. The ethernet cable running from the router. The power cable for a floor lamp. These are all cables with a defined wall-level presence, and they should be managed with the same discipline as under-desk cables.
Flat cable raceways — thin, paintable channels that mount flush to the wall surface — handle wall-level cable runs at minimal cost and with a finished look that’s almost invisible when painted to match the wall. For rental apartments where drilling and painting isn’t an option, cord concealer covers with paintable surfaces work well with heavy command strips.
The single rule for wall cables: they should run along edges (baseboard, door frame, wall corner) rather than diagonally across open wall space. An edge run is barely visible. A diagonal run looks like exactly what it is — an unmanaged cable taking the path of least resistance.
The Wireless Offset: Products Worth Buying to Eliminate Cables Entirely
The best cable management for a cable is not buying it in the first place. Before purchasing any cable management hardware, consider these wireless alternatives that our team uses to reduce cable count:
Wireless keyboard and mouse — eliminates 2 cables with one pair. The Logitech MX Master 3S and MX Keys S combo use a single Bolt USB receiver, meaning one USB port replaces two cable connections.
Wireless phone charger built into the desk — eliminates the phone charging cable entirely. Several standing desk brands offer integrated Qi charging pads; third-party under-desk mount chargers are available for $25–$40.
WiFi over Ethernet — the most controversial recommendation we make, but worth mentioning. For setups where WiFi 6 or 6E signal is strong, eliminating the ethernet cable removes one of the longest and most difficult cables to manage cleanly. For video editing, large file transfers, or latency-sensitive work, ethernet is non-negotiable. For browsing, communication, and document work, modern WiFi is indistinguishable.
Maintenance: How to Keep It Clean
A managed setup that isn’t maintained regresses to chaos. The maintenance requirement is minimal, but it requires a consistent habit.
The 30-second daily rule: Every time you add or remove a device, spend 30 seconds routing its cable correctly before you start work. A cable placed correctly once takes 30 seconds. A cable left unrouted for a week becomes a cable you’ve stopped seeing — and that you’ll need 10 minutes to deal with properly later.
The quarterly audit: Every three months, repeat the Phase 1 audit. Device configurations change, cables get displaced, new additions create new routing problems. A quarterly audit catches drift before it becomes chaos.
The trigger for a full reset: If more than 3 new devices have been added since the last full management session, do a full reset rather than trying to patch the existing system incrementally. Incremental patching over a significantly changed cable load produces a setup that looks managed in parts and chaotic in others — worse aesthetically than starting over.
The Setup You End Up With
When the system is complete — tray installed, raceways in place, sleeves on the legs, hub consolidating the surface connections, bundles tied and labeled — you’ll sit back and look at a desk where the cables have effectively vanished.
Not because they’re gone. Because they’re invisible from every angle that matters, they’re organized in a way that makes sense structurally, and they’re held in place by an infrastructure that handles any future addition without requiring everything to be redone.
That’s the standard. It’s achievable in one afternoon. It costs less than $100 in hardware for most setups. And it changes the entire visual character of your workspace in a way that no monitor, keyboard, or lighting upgrade can replicate — because it removes visual noise rather than adding visual interest.
Remove the chaos, and everything else suddenly looks like it belongs.
Complete Product List
Quick reference for everything recommended in this guide:
IKEA SIGNUM Cable Tray — Under-desk power strip housing · $15–$20 → (Insert your Amazon affiliate link here)
J Channel Cable Raceway Kit — Under-desk horizontal routing · $18–$28 → (Insert your Amazon affiliate link here)
Neoprene Cable Management Sleeve — Vertical desk leg drops · $12–$18 → (Insert your Amazon affiliate link here)
Anker USB-C Hub 341, 7-in-1 — Surface cable consolidation · $35–$45 → (Insert your Amazon affiliate link here)
Velcro One-Wrap Cable Ties, 100-pack — Cable bundling throughout · $12–$16 → (Insert your Amazon affiliate link here)
Alex Tech 157-Piece Cable Management Kit — Complete consumables kit · $22–$30 → (Insert your Amazon affiliate link here)
Total setup cost: $114–$157 for complete cable management infrastructure.
Guide reflects products and techniques used across 80+ DeskZen Lab setup builds between 2022 and 2025. All products were independently purchased and are in active use in our lab setups.
Affiliate Disclosure
DeskZen Lab participates in the Amazon Services LLC Associates Program. When you purchase through our links, we earn a small commission at no additional cost to you. Every product in this guide is one we actively use in our own setup builds — no brand has paid for placement or influenced our recommendations.